Thursday, December 16, 2010

Valentine With Christmas Colors

Need some fresh ideas for Christmas and Valentines?  This card could go either way.  Sometimes I get so sick of Valentine cards and Christmas cards that only use traditional colors, so I switched it up a bit.  And the stamp set used here is a wedding set!  So now that we've combined 3 occasions, I kind of like it.  :-)   The background is Teahouse with River Rock ink on River Rock cardstock.  I really like the subtle pattern that this creates.  And have I mentioned lately how much I love our adhesive pearls and rhinestones??  Love 'em!

Thanks for stopping by the Stamping Station.

Have a blessed Christmas,
Julie
Share this Post Share to Facebook Share to Twitter Email This Pin This


Wednesday, December 8, 2010

Quick CAS Card

I love black and white with a splash of color.  I made this card with leftovers from a workshop.  2-Step stamping and a bit of ribbon and sponging complete the card. 

Ok, back to my long, long, LONG list of things that need to get done....

Blessings!
Julie
Share this Post Share to Facebook Share to Twitter Email This Pin This


Thursday, December 2, 2010

A Fun Fold

 There's a story behind this one!  Last year at convention, a friend of mine came back to the hotel room with a gorgeous folded tree swap.  Of COURSE I had to figure out the fold.  And this is my version of that tree fold.  What I love is that it looks 3-D but folds flat for mailing.  Double-bonus!  I really do like the way this tree shows off the beautiful Deck the Halls DSP.  I thought it looked a bit like quilting, so added the faux stitching. 
But then my brain got to whirling....what ELSE could I do with that fold?  Hmmmm.....and what would it look like if you layered them in a different way?  And could I make a snowflake out of it?  Eureka!
And so that's what I did!  I used some retired DSP, just in case it didn't turn out so great...and used two different designs of DSP...I kind of like it!  I was going to put a snowflake or flower in the middle, but that was too busy, so I finished it off with a glitter brad.  (Have I mentioned how much I love those things and how gorgeous they are?!?!) 
Now the challenge is to come up with more ideas using this fold.  Can you help me out with that?  I'd love to hear your ideas.
So, thanks for stopping by once again at the Stamping Station.
Blessings to you,
Julie
Share this Post Share to Facebook Share to Twitter Email This Pin This


Tuesday, November 30, 2010

Thanksgiving a little late

 I meant to post this last week, but time and preparations for the holiday waylaid me.  Sorry about that.  This is a project that we made at my last workshop.  I love these In-Colors together and thought they would go great with the Day of Gratitude stamp set.  The greeting on this card is from Because I Care.
And this is another version. I have a friend who wants to buy some cards that are all-occasion, so I put the medallion from Day of Gratitude in the center instead of a greeting. 
I really love the layered window look and the way the scallop edge border punch coordinates so well with the scallop circle punches.

So, it's late, but I hope you had a wonderful Thanksgiving.  I'm grateful for those of you who take the time to stop by.

Thanksgiving Blessings,
Julie
Share this Post Share to Facebook Share to Twitter Email This Pin This


Monday, November 29, 2010

SHHHHHHH!!!!!! It's a secret! :-D

Don't tell, but we're making a beautiful calendar for my in-laws for Christmas!  We've designed it on My Digital Studio and it was so easy.  Since the calendar contains pics of my children and nieces and nephews, I chose to just share the ones with my kids on them.  (Easier than getting permission and then the whole surprise would be out there!)  Anyway, here's your sneak peek of our 12 x 12 personalized calendar...

Nate's my middle child.  His smile and laugh are very infectious. 

Todd is my oldest.  He enjoyed Hawaii, but was sick of the heat after 3 days and wanted to go back home.  The silver lining on that one is that hopefully he'll always live close to us and not move to the other side of the country!
Zach is my youngest.  He's full of all kinds of personality.  He's also a ham! 


So now you need to keep this quiet and don't tell my in-laws, k?  I'm counting on you!  Oh, and if you want to have the same fun, My Digital Studio (which we used to make the calendar) is 50% off through tomorrow (the 30th), so go click on the shop now button at the top of my blog and order quick before you have to pay full price for this amazing tool.

Blessings,
Julie
Share this Post Share to Facebook Share to Twitter Email This Pin This


You've got to see this!

I don't usually post to other blogs as my whole blogpost, but this one is incredible. 

You see, Stampin' Up! set a goal this year of 10,000 new recruits.  We've thankfully reached and surpassed that goal, but here's the story of what happened for the 10,000th recruit. 

Becky Roberts Recruiting the 10,000th Recruit

This just really shows how much Stampin' Up! is a family and cares about the demos and customers.  Shelli, the CEO, is amazing and real, even though she must be rich. 

Don't feel bad if you cry through the reading of Becky's post.  It's like one of those wonderful Hallmark commercials.  :-)

Blessings,
Julie
Share this Post Share to Facebook Share to Twitter Email This Pin This


Wednesday, November 24, 2010

Online Spectacular Sale Going On Now....

Click here to go to my online store to see all of the wonderful products that are marked down up to 50% off!!!!  You definitely want to do your shopping now to take advantage of these awesome offers!
Share this Post Share to Facebook Share to Twitter Email This Pin This


Monday, November 22, 2010

Sponge the Frame

The CAS (Clean and Simple) challenge on SCS today is sponging.  The trick is to keep your design simple and clean.  I chose to sponge my frame so that it has variations of color.  Of course I had to add a lot of glitter to the snowflakes and the outside of the frame...snowflake cards just need that, don't you think?  The background is stamped with Serene Snowflakes in Baja Breeze.  The snowflakes were punched with the SU snowflake punch out of Baja Breeze cardstock and then covered with Dazzling Diamonds glitter.  (A must have in my opinion!)  The frame was cut with my Scallop Oval Frame Bigz Die and then spnged.  The greeting is from the wonderful Many Merry Messages stamp set. 

Thanks for stopping by the Stamping Station.  Stay tuned because I have a really wodnerful fold to share with you.

Blessings,
Julie
Share this Post Share to Facebook Share to Twitter Email This Pin This


Saturday, November 13, 2010

It's Present Opening Time...

The other day I was goofing around with my DSP.  Look what I came up with!  I liked it so much, that I made a swap out of it.  It's a quick and easy way to use the DSP for a great card.  This could also double as a birthday card.  All that was required was my Candy Cane Specialty DSP, All Holidays stamp set, and my 1/8" red taffeta ribbon.  Oh, don't forget the polka dot embossing folder.  That thing is da bomb! 

Thanks for stopping by the Stamping Station. 

Blessings,
Julie
Share this Post Share to Facebook Share to Twitter Email This Pin This


Friday, November 12, 2010

I Love To Coordinate Things....

Yes, I do!  This is a hostess thank you card that I made last month.  I really wanted the tags on the bags to match the hostess' card, so I added a tag onto her card, also.  Day of Gratitude is the stamp set used here, along with the sentiment from Fresh Cuts.  We received this Day of Gratitude stamp set at the Portland Regionals.  (yeah, have I mentioned enough times how much fun we had?  it was a total BLAST!!!!)  Looking for a new color combo, I used Cherry Cobbler and Pear Pizzazz.  And yes, I did use the pearls again.  Those adhesive pearls and rhinestones are quickly becoming my all-time favorite accessory! 

Well, tomorrow is the first Christmas Card Crank at my house, so I'd better go and get ready for it.  No one wants to see my house looking the way it does right now!  But, you know what?  I'd rather be stamping!  Hahahahaha!  I bet most of you can say the same thing.  Too bad cleaning up the stamping room has to take a lower priority than the rest of the house.  :-(

Thanks for stopping by the Stamping Station.

Blessings,
Julie
Share this Post Share to Facebook Share to Twitter Email This Pin This


Monday, November 8, 2010

Finally! The Christmas Card Crank Projects!

I'm so excited.  I love the Christmas Card Cranks and they're just about here!  This is one of my favorites, but I really like them all.  This was the last design and the first one I wanted to show you.  :-)
 And this one you've seen already.  I love the simplicity that you can have with this gorgeous stamp.  And the Concord Crush and Whisper White make a very royal combo, don't you think?
Cherry Cobbler is such a wonderful color!  It added a very rich feeling to this card.  Add a few touches of gold and we're off to the races!  That's Dasher, leading the pack.
 And we have to keep this one fairly simple to showcase the beautiful snowflakes embossing folder.  Aren't those snowflakes gorgeous?!
And to finish off the day, we have the snowglobe snowman, with some accompanying snowflakes.  Those Rhinestone jewels are da bomb!  Who doesn't like a sheet of bling that already has adhesive on it?  I'm afraid that I cannot divulge how many sheets of these I've gone through already.  :-)  I'm pleading the 5th!


And that is the lineup for the Christmas Card Crank!  The guests will be making 20 cards, 4 of each design.   Please email me at the address on the left if you would like to purchase the supplies and have them mailed to you. 

Thanks for stopping by the Stamping Station.

Blessings,
Julie
Share this Post Share to Facebook Share to Twitter Email This Pin This


And Still....

...loading a picture is still not available!  Grrrrr....how am I supposed to show you all of the cute Christmas cards that I've been creating?  :-(  So sad.  I'll try again later.
Share this Post Share to Facebook Share to Twitter Email This Pin This


Sunday, November 7, 2010

Blogger's Preventing Me....

from posting a photo!  I'll be uploading photos of the Christmas Card Crank as soon as Blogger lets me.  Stay tuned!  :-D
Share this Post Share to Facebook Share to Twitter Email This Pin This


Wednesday, November 3, 2010

Regionals Swap CASE

 Sorry about the bad lighting and the flipped photo.  Blogger is still giving me trouble with portrait style photos.  :(  Anyway, this is a swap that my upline Sharon received.  We were sitting at the Rib Eye Restaurant, (somewhere south of Chehalis and they have really delicious food!) and I just had to click a picture of it.  The design is so simple and the Very Vanilla really is beautiful with the Blushing Bride In Color.  So, snapped a photo and of COURSE I had to CASE it!  So, without referring to the original card/photo, I went downstairs and made my own.  BTW, the swapper didn't put their name on the back, so I am unable to let you know who came up with this beauty.
And this is my version.  :-)  I flipped the textured Vanilla over and stamped the French Script on the flat side.  You'll need to click on it to see how the texture doesn't have the french script on it.  I thought the Oval All sentiment would go nicely with the texture folder and I think I really like it.  Besides, I don't have the new punch yet to completely CASE the original, so this will have to do.

Thanks for stopping by the Stamping Station.  Happy November to you!  (Can it really be November already???!!!!)

Blessings,
Julie
Share this Post Share to Facebook Share to Twitter Email This Pin This


Friday, October 29, 2010

Workshop Projects

Birthday Bakery, Wild Wasabi, Poppy Parade, Whisper White, Build A Bear DSP, Hodgepodge Hardware Silver, Boho Blossoms Punch, Certainly Celery 1/4" Grosgrain, Cutter Kit for distressing.
 Just thought I'd share with you a few more workshop Make & Takes.  This first card's fold was inspired by some cardstock that SU sent for our school's auction. The dimensions are 4 1/4" x 11 1/2".  The score marks are at 1" and 6 1/2".  This was definitely a hit at the workshops.  Quite a simple card, too.  The stamp set is a Level 1 hostess set and the saying on the inside is "this is no day for just a sliver".  Isn't that darling?!
Because I Care, Black StazOn, Pear Pizzazz, Whisper White, Foam Mat and Embossing Stylus, Scallop Trim Border and Edge Punches, Black Brads
 This card was inspired by one on StampinAddicts.com.  After stamping in StazOn on Vellum, we turned it over, placed it on a foam mat and used the stylus over the stamped image.  This makes the vellum turn white and gives you a 3-D feel.  Really cool!
Cute by the Inch, Charming, Basic Black, Very Vanilla, Marina Mist, Scallop Square and Edge Punches, Raven Black Lace, Mini Library Clips, Petal Card Punch
And this one was my favorite.  I also made one with Tangerine Tango and Basic Black, but I liked the Marina Mist better.  I love those little library clips.  They're adorable and really finish off the card.  The little strip of Marina Mist over the scallop border...do you see it?  It's the LEFTOVER piece after you use the scallop punch!  As any true papercrafter knows, we just can't waste anything, right?

Well, thanks for stopping by the Stamping Station.  My next posts will be based on the swaps from Regionals. 

Blessings!
Julie
Share this Post Share to Facebook Share to Twitter Email This Pin This


Tuesday, October 26, 2010

My BFF's Color Challenge

My wonderful friend Joanne is the hostess of the Color Combination challenge this week on Splitcoaststampers.com.  What an honor, but she so TOTALLY deserves it.  So, in honor of my friend, Joanne, who TOTALLY deserves this honor, I've used Tote-Ally Tess and the Morning Cup sets.  The color challenge is Baja Breeze, Crumb Cake, and Blushing Bride.  At first I didn't quite know what to do with it and then I got this idea to make Tess into an espresso waitress.  After cutting out the oval and frame from Very Vanilla, I sponged the frame in Crumb Cake and then spritzed it with Log Cabin Smooch Spritz from Stampin' Up!  The serving tray is the smaller oval, cut down a bit and sponged on the edges.  I also cut the top half of the apron off of the Tote-ally Tess apron.  A few brads and retired DSP and this girl is ready to serve!  Hope you like her!

Thanks for stopping by the Stamping Station.

Blessings,
Julie
Share this Post Share to Facebook Share to Twitter Email This Pin This


Saturday, October 23, 2010

Auction Baskets....

 Our school had an auction last night.  Since I'm scheduling this post, I'm not sure how successful it was, but they usually do really well!  As 2nd grade parents, we put a Coffee, Tea and Chocolate basket together for a silent auction item.  After we were all done gathering the items, a light bulb turned on in my head.  (got the visual there?  great in cartoon format, isn't it?!)  Here's the conversation that went on in my head....

"Hey, I have stamps for the coffee and tea theme!  Duh!  I really need to make some cards to be included in that basket!  Why was I only thinking about the real coffee and tea?  Double Duh!"
So, I quickly went home and whipped up some cards with cardstocks left over from workshop projects.  I also included the coffee card that I showed you yesterday as one of my swaps. 

And as usual, I wrote to Stampin' Up! when the auction was being planned, asking for a donation.  SU! outdid themselves this year and sent almost $500 worth of retired merchandise!!!!  I made 4 silent auction baskets with the merchandise and threw in some free Totally Hands On workshop certificates as well.  What an awesome way to support the local schools! 

Thanks for stopping by the Stamping Station.

Blessings,
Julie

Most of the DSP and colors on these cards are retired.
Share this Post Share to Facebook Share to Twitter Email This Pin This


Friday, October 22, 2010

Portland Regionals Swaps

 Yahoo!!!!  We leave for Regionals today.  I've been working on these cards for awhile and have been wanting to share.  It's so hard to hold back on you all!  This first card is my general swap.  I cut out 30 of those mugs and watercolored 30 percolators!!!!  Let's hope that it's good enough that people will want to swap with me.  Sorry that the color is a bit off on this one.  I couldn't get them "just right".  Colors should look like Naturals Ivory, Riding Hood Red, Basic Gray and Basic Black.  The percolator was colored with an Aquapainter and Watercolor Wonder Crayons.
And this is my WOW swap for some sidelines.  I sponged with my daubers over the Vintage Frame stencil with Cajun Craze, Marina Mist, and Crumb Cake.  The centers of the flowers are Crumb Cake cardstock, covered with Versamark and Iridescent Ice embossing powder.  I love how that emb. pdr. melts and looks so sparkly!  the leaves are a sizzlit and the butterflies are an embosslit.  Ok.  Now you know all of my secrets for Regionals.  I hope you have a wonderful weekend and I hope that I have lots of wonderful swaps to share with you next week.

Thanks for stopping by the Stamping Station!

Blessings,
Julie
Share this Post Share to Facebook Share to Twitter Email This Pin This


Friday, October 15, 2010

Baby Bundle Birthday

Nothing fancy, but a fun card that we're making this month at the workshops.  And after the photo, I did turn the bear slightly because he looked too much at attention.  :-)  The bear was colored in with my blender pen for a watercolored look.  it's a quick and easy card that doesn't take much time...the best kind!  
Thanks for stopping by the Stamping Station!
Blessings,
Julie

Recipe:  Baby  Bundle and Beary Best Wishes stamp sets.  Early Espresso, Crumb Cake, and Tempting Turquoise ink.  Whisper White, Tempting Turquoise, and Crumb Cake cardstock.  1 3/4" Scallop Circle Punch, 1 3/8" Circle Punch, Dotted Scallop Ribbon Border Punch, Perfect Polka Dots embossing folder, dimensionals.
Share this Post Share to Facebook Share to Twitter Email This Pin This


Wednesday, October 13, 2010

I Don't Like Scary Halloween Stuff....

...but I do like the fun and friendly images.  Yup, I'm one of those parents who refuses to buy the Grim Reaper and other gory costumes for my kids.  I figure there's enough horror in the world, we don't need to glorify it.  Just my take on it.
    This here cutie owl card is a project we'll be making at this month's events.  The card design is based on a swap from my wonderful upline Sharon.  She made a card similar to this with the bat punch.  Since I didn't have it, I decided to put the owl on the branch in front of the moon.  There's a bit of sponging on the edges of the ovals for the pumpkin.  "And where did I get that awesome stem for the pumpkin?" you ask.  Well, when I punched the branch out with the 2-Step Bird punch, the wing punched out, also.  So, I snipped half of it off and it became an instant stem!  I really, really love the versatility of the SU! punches.  When I punched the owl out, I didn't want to glue on the tiny dot eyes, so gave the brown a little love with my white gel pen.  Much easier!
Thanks for stopping by the Stamping Station! 
Blessings,
Julie
Recipe: 2-Step Owl Punch, 2-Step Bird Punch, 1 1/4" Circle Punch, 13/4" x 7/8" Oval Punch. Always Artichoke, Pumpkin Pie, Concord Crush, Daffodil Delight, Crumb Cake, and Whisper White cardstocks.
Share this Post Share to Facebook Share to Twitter Email This Pin This


Thursday, October 7, 2010

Christmas Card Crank Project

Christmas Card Crank?  It's a Christmas Stamp A Stack.  20 cards in one day, so they must be simple for everyone to get through the lot!  This is one of the projects that we will be doing.  I love the simplicity of color here and Concord Crush is a very royal color. 


Christmas Postcard, Whisper White, Concord Crush
I'll be sending out the registration forms next week with photos of all five cards.  The guests will be making 4 cards of each design and registration is required so that I know how many to plan for.  I'll also be offering the cardstock/accessories supplies available to purchase online, so please stay tuned.

Thanks for stopping by the Stamping Station

Blessings,
Julie

Countdown till Christmas:  78 days
Share this Post Share to Facebook Share to Twitter Email This Pin This


Tuesday, October 5, 2010

Cleaning Up the Scraps Again

Crazy for Cupcakes, Snowflake Spot, Only Orange, Pacific Point, Whisper White, Dazzling Diamonds
 Remember this DSP?  It's from about 5 years ago.  I always really liked it, but just didn't use it up.  Well, in my efforts to de-clutter (if that's ever possible!) the scrap room, I determined to use this piece up.  I made two identical cards and I also used some retired colors.  That's a good thing, if you've ever seen my stash of retired cardstock!

Dasher, Baja Breeze
And here's another card made from a stray piece of DSP.  I loved this DSP when it was current and now that the Baja Breeze color is back, I plan on using more of it up!  This card was made specifically to send to the child in Indonesia that we support through Compassion International.  We have sponsored MANY children over the last 20 years and are still blessed to see the difference that a few dollars and some letters can make.  What an amazing blessing!

Thanks for stopping by the Stamping Station.

Blessings to you!
Julie

Countdown to Christmas:  80 days
Share this Post Share to Facebook Share to Twitter Email This Pin This


Monday, October 4, 2010

Paper Flower Scallop Circle Bouquet

Ever need a bouquet and hate to have the flowers die right away?  Here's an idea.  A guest at a workshop showed me how she cut many flowers at once with her Cricut ... and then I told her how easy that would be with the Big Shot and the Bigz dies.  I used some of my retired colors for this project (yoyo yellow, crushed curry, ruby red, only orange, really rust), cut out 4 scallops for each flower, snipped into the centers, folded the petals both directions, then used pop-up glue dots to attach them to floral tape covered wooden dowels from H.D.  The centers are 1" and 1 1/4" punched circles.  Super easy and I'll have this bouquet all season long!  Yes!

Thanks for stopping by the Stamping Station.

Blessings,
Julie
Share this Post Share to Facebook Share to Twitter Email This Pin This


Friday, October 1, 2010

Apparently, Landscape Orientation is Working....

Ok, so I can't share with you the cards that are Portrait style, but I can share this one with you.  Grrr....  I used the retired Slumber Party DSP on the squares.  I will be sharing how to make this gorgeous flower with my World Card Making Day guests tomorrow and then I will post the instructions for you.  I sure wish that I could find the blog where this technique was shown, but alas, I can't find it back.  So...if this was from your blog or you know where it was posted, please let me know! 
The greeting is from Because I Care, a beeeeeeeeeautiful Hostess Level 1 stamp set.  The frame behind it was cut with the Big Shot and the Matchbox XL Die.  the pearls are the new adhesive backed half pearls.  These are the BEST!!!!  Seriously, this could be one of your cheapest and best investments in your card making supplies!

Thanks for stopping by the Stamping Station.  I'm hoping that I'll have better news about the photos soon!

Blessings,
Julie

Recipe:  Because I Care stamp set. Sahara Sand & Riding Hood Red cardstock.  Modern Label, 2 3/8" Scallop Circle and Fancy Flower punches. Big Shot and Perfect Details texturz plate.  Vanilla Shimmer Smooch Spritz and Basic Pearls.
Share this Post Share to Facebook Share to Twitter Email This Pin This


Please Stand By...

...we are experiencing technical difficulties.  Blogger has a new composing/editing program and it's twisting all of my photos sideways.  I'm not very happy about this!  So please stay tuned for the next projects while I try to find a solution.

Thanks,
Julie
Share this Post Share to Facebook Share to Twitter Email This Pin This


Tuesday, September 28, 2010

No Need to Color the Whole Picture In

I totally CASE'd this card from Sharon Field's blog.  You know, when you really like a card, sometimes the best thing to do is CASE it!  I changed the framing slightly and chose a different greeting, but that's about the only difference.  Oh, and I didn't emboss the inside.  Super easy card to make and with the outlining of a lighter color, no need to color in the whole image.  That's a quick and easy card. 

Thanks for stopping by the Stamping Station.

Blessings,

Julie

Recipe:  Cajun Craze, Basic Gray & Whisper White cardstocks.  Three Little Words and Growing Green stamp sets. Basic Gray Classic Ink.  Baja Breeze and So Saffron Stampin' Write Markers.  The Tearing Edge tearing guide.
Share this Post Share to Facebook Share to Twitter Email This Pin This


Saturday, September 25, 2010

Projects for Upcoming World Cardmaking Day Party

 I'm getting really excited to have a fun day here next week Saturday.  This scrunched up flower is something that I'll be teaching.  I can't find the blog that I saw the instructions on, so if it was yours, please let me know!  I'd love to give you credit.  I really love the way the Vanilla Smooch Spritz makes this flower sparkle.  I'll share the full card next week.
 And you've seen this card already, but wanted to include it in this post since it will be a Make and Take at the party.
And these sweet little purse cards are the other Make and Take.  They're super easy to make, using the Scallop Oval XL die and the Big Shot.

So, if you haven't RSVP'd to the event yet, please let me know!  If you live out of town and would still like to make the projects, you can purchase the paper, instructions and accessories supplies for these two projects for $5, including shipping.   Just email me at the address on the upper left and we'll iron out the details.  If you also need the stamp sets for the birthday card, click on the catalog link, select me as your demonstrator and purchase the On Your Birthday and Hello Again stamp sets.

Thanks for stopping by the Stamping Station.

Blessings,
Julie
Share this Post Share to Facebook Share to Twitter Email This Pin This


Friday, September 24, 2010

Hello Again

Do you have a lot of Designer Series Paper scraps hanging around?  Well, I sure do!  I've been on a mission to clean up my scrap room this week.  (Some of you know what a job that is going to be!)  I've had these 3 scraps hanging around so that I could eventually make a card with them.  Well, clean up day includes getting rid of the piles...so I made a card while I was cleaning up! 

Hello Again, On Your Birthday, Poppy Parade, Certainly Celery, Tempting Turquoise, Whisper White)
And I like it so much, that we'll be making it at my World Card Making Day party next week.  I love the sweet colors in this Designer Series Paper (Build A Bear Pawsitively Prints II) and don't you just love having the color scheme already planned for you?  At the party, we'll probably texture the background Celery after we stamp it. 

As you know, I've been changing the layout and design of my blog.  I hope you're finding it easier to locate what you're looking for.

Thanks for stopping by the Stamping Station.  Stamping wishes to you all.

Blessings,
Julie
Share this Post Share to Facebook Share to Twitter Email This Pin This


Thursday, September 23, 2010

Teahouse Makes it Easy!


If you want a card in 5 minutes, I HIGHLY recommend the Teahouse Background Stamp.  This card takes maybe 5 minutes at the most.  Does it look like it?  The organza white ribbon dresses it up a bit, as does the rhinestone in the center of the flower.  The colors used here are Wild Wasabi and Tangerine Tango, with the background and sentiment stamped on Confetti White.  Sentiment Silhouettes was used for the oval images and is a Level 1 Hostess Set.  Isn't it pretty?!?!  Love it!

Thanks for stopping by the Stamping Station.

Blessings,
Julie
Share this Post Share to Facebook Share to Twitter Email This Pin This


Sunday, September 19, 2010

Growing Greener Every Day

At my last workshop, we had a lot of fun watercoloring with markers. The guests were remarking on how easy it was and how great it turned out. Want to see? It's quite easy!

First, you need to stamp your image in a permanent ink, like the Jet Black StazOn that Stampin' Up! sells. This is a wonderful product and I love the true black color. After stamping your outline image, use your Stampin' Write marker to outline some of the lines, but not all. Take your Aquapainter and spread the color out from the lines. We finished off the center piece with the Scallop Trim Border punch. Just for this sample, I've added the Vintage Wallpaper embossing folder on the background vanilla.

Well, thanks for stopping by, once again.

Blessings,
Julie

Recipe: Growing Green stamp set; Early Espresso, Garden Green, and Very Vanilla card stocks; Woodland Walk DSP.
Share this Post Share to Facebook Share to Twitter Email This Pin This


Saturday, September 18, 2010

Autumn Splendor

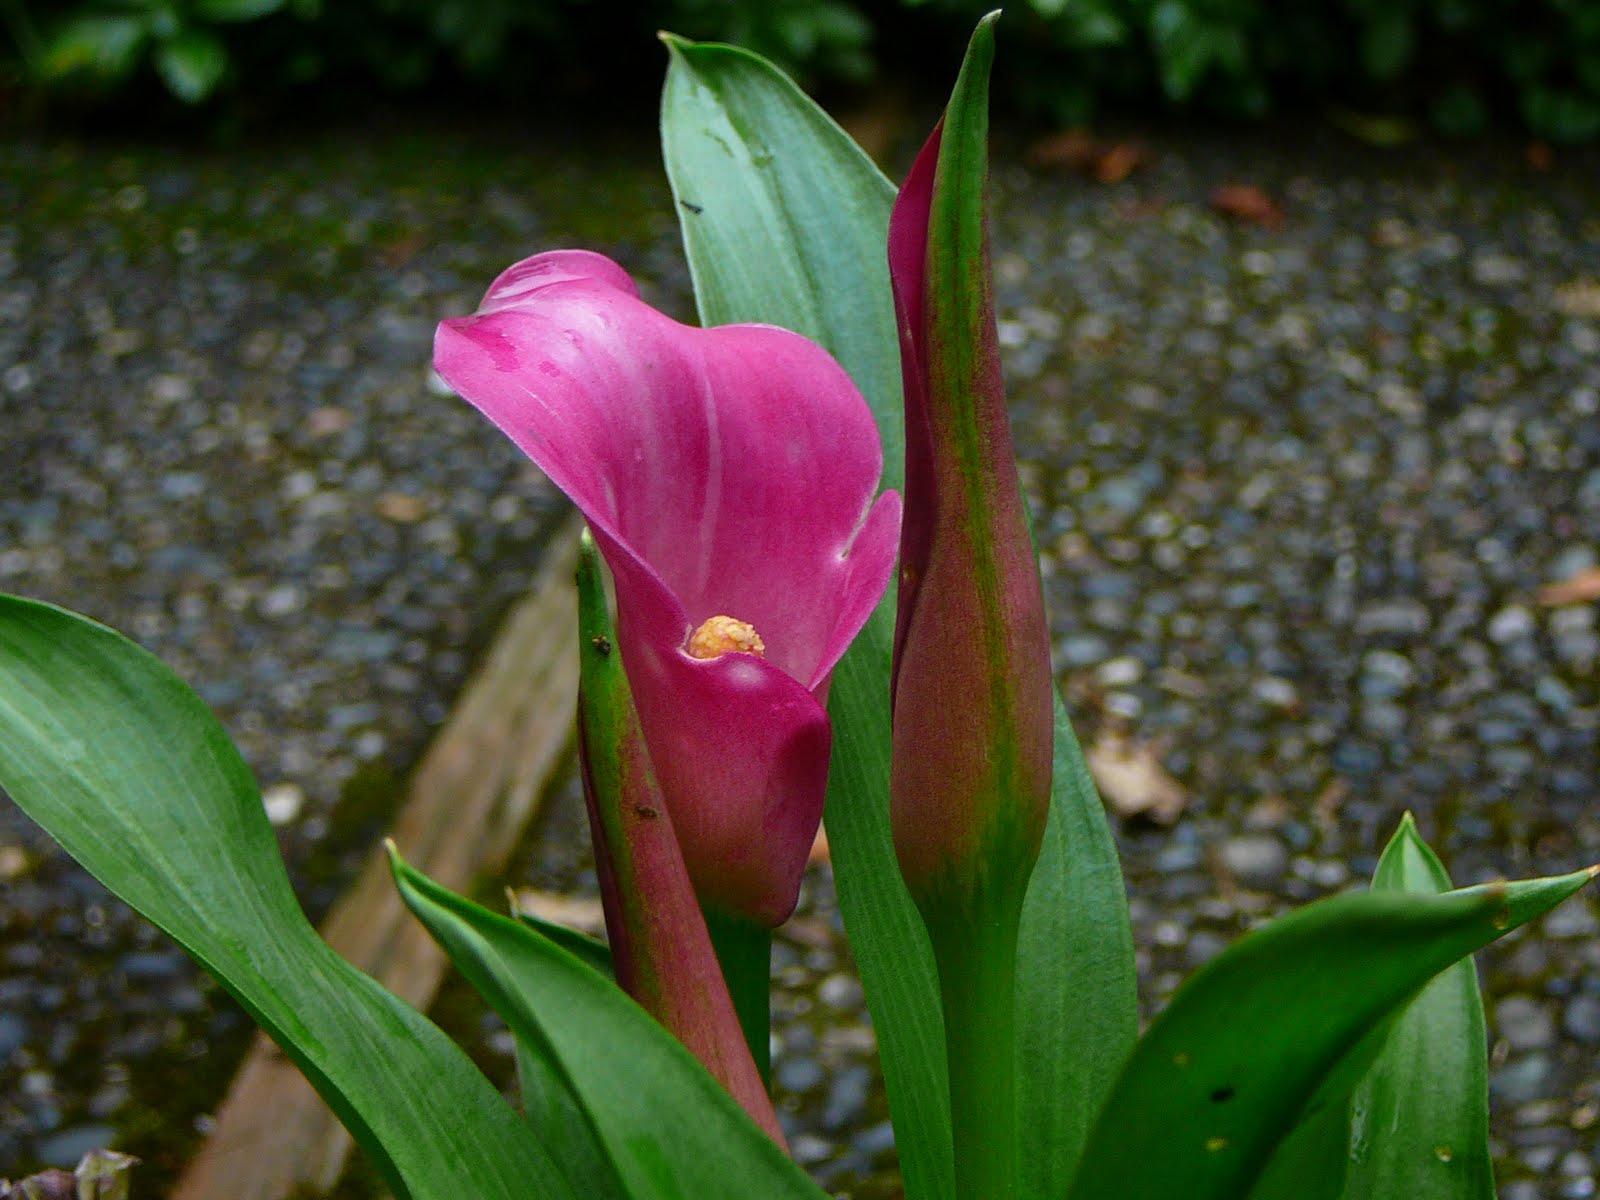
I just had to show you my beautiful calla lily. We had such a wet summer, that most of my callas didn't get a chance to bloom, but this little beauty did. I love the shape and elegance of the calla lily. It's one of my favorite flowers. I hope we get a few more brave flowers before the frosts start up. Now to pick up this color combo and make something of it. I dare you to try, too! :-)


And this little pumpkin was made with 12 strips of 3" x 1/2" Cajun Craze cardstock. The leaves are stamped with the leaf from Autumn Harvest. It's one of the decorations that I'm making for my World Card Making Day party. And for once, my alder leaves came in handy! (Usually they are just pests.) So what have you made to reflect the beautiful colors of nature lately? I'd love to see what you've made. Feel free to leave a link to a public gallery in the comments.

Thanks for stopping by the Stamping Station.

Blessings,
Julie
Share this Post Share to Facebook Share to Twitter Email This Pin This


Thursday, September 16, 2010

New Blogheader With My Digital Studio

Sometimes you just have to try something new. I've been revamping my blog, trying to make it more efficient and easy to read. Well, then I started looking at my blogheader. Hey, wait! There wasn't a blogheader! So, why not open My Digital Studio and try making one? A lot of other people have, so I should be able to also, right?
With much playing around and experimenting, I finally figured out what the design should look like. This color combo (Crumb Cake [formerly known as Kraft], Basic Black and Whisper White) is one of my favorites. I used to add Ruby Red to it for a splash but now my favorite splash is Cherry Cobbler. Getting this header to fit was a bit trickier, but I did finally figure it out. I hope you like the new look.

Thanks for stopping by the Stamping Station!

Blessings,
Julie
Share this Post Share to Facebook Share to Twitter Email This Pin This


Tuesday, September 14, 2010

Same Card...Different Background

Disclaimer: sorry about the horrid photos. I really need a photo box!
Here's a fun discovery. I made the same card with two different background colors and they have such a different feel. Oh, let me back up and let you know where these cards came from. My upline, Sharon, and I had a Holiday Mini Catalog swap between the two of us. For inspiration, I used Sketch Challenge 65 from stampinaddicts.com to get me started. (The great thing about these sketches are that they start simple and you can embellish as you wish or keep it simple.) These cards use the Christmas Postcard stamp again and our gold embossing powder.
Now add to that the Espresso taffeta ribbon and Deck the Halls DSP and you almost have your card already! I added two pieces of my favorite Cherry Cobbler red and one piece of my Always Artichoke and I'm finished! (Ok, ok, I did use my Ticket Corner Punch, also!) I could easily pump out a bunch of these and they'll mail well since they're flat.
I tell ya, I'm totally LOVING this DSP! It makes for gorgeous and easy cards. If you're interested in seeing the rest of the papers in the pack, go the the Holiday Mini Catalog button on the right and make sure to designate me as your demo.

Thanks for stopping by the Stamping Station once again.

Blessings,
Julie
Share this Post Share to Facebook Share to Twitter Email This Pin This


Monday, September 13, 2010

2M Work Party Rescheduled

Sorry folks, but I have a sick boy here, starting his second round of antibiotics. I've rescheduled the Work Party to Monday, Sept. 27, 7 - 10 pm. RSVP's are required for attending so that I know how many places to set up.

Thanks,
Julie
Share this Post Share to Facebook Share to Twitter Email This Pin This


DSP Makes For an Easy Christmas Card!

Playing with my new single stamp from the Holiday Mini Catalog. The DSP is from the same Mini. I embossed the Christmas Postcard image in gold after stamping with VersaMark and then colored in some of the areas. I wish you could see it better in the photo. The next step was to cut some layers and glue together. Really quick and easy! You can bet that I'll be featuring this stamp on one of the Christmas Card Crank projects. Oh, and isn't that new Cherry Cobbler color YUMMY?!?!

Thanks for stopping by the Stamping Station.

Blessings!
Julie
Share this Post Share to Facebook Share to Twitter Email This Pin This


Sunday, September 12, 2010

Ribbons and Roses and Resist...Oh My!

Yahoo! I had time to play in my stamp room again today. For today's inspiration, I took my upline, Sharon's, challenge to use the emboss resist technique. How long since you've resisted? And then I had to make one of those fun ribbon roses that have been so hot over the last few weeks. And then last week's technique challenge 66 from Stampin' Addicts was ribbon weaving. Put it all together and this is what I came up with. Oh, and it also fits in with last week's sketch challenge 67 from Stampin' Addicts. So now I'm quite caught up with my challenges and it's time to put away the folded laundry.

Thanks for stopping by the Stamping Station!

Blessings,
Julie

p.s. 2M Work Party on Monday at my house, but I need your RSVP first.

Recipe: Upsy Daisy and Curly Cute stamp sets; Whisper White & Marina Mist cardstocks; retired DSP; So Saffron and Marina Mist classic ink; VersaMark Ink; Scallop Ribbon Edge punch, sponge daubers, Marina Mist 1/8" Taffeta, White Embossing Powder, Sticky Strip.
Share this Post Share to Facebook Share to Twitter Email This Pin This


Saturday, September 11, 2010

Teabag Holder Gift

Do you like making 3-D projects? Well, I'm really liking this one. I started with the 3D071 challenge from Stampin' Addicts. I used a Bigelow tea bag so I increased the main piece of cardstock to 8 1/2" x 3 3/4" and scored at 2" and 5 1/4". The decorative pieces measure 3 3/8" x 2 7/8", 3 1/4" x 2 3/4", 3" x 2 1/2", and 2 3/4" x 2 1/4". This teabag holder was a great excuse to use my cute new Two-Step Owl punch. He's sitting on the branch from the Two-Step Bird punch, another one of my favorites. Isn't he adorable???!!!!! If you've seen him and haven't decided if you need him yet, YOU DO! :-)
Ok, so please ignore the fact that this picture is sideways. Everything we tried just didn't work. We even went into the html and nothing worked. Grrrr... Anyway, the flap is covered by a couple of strips made with the new Tasteful Trim XL Die from Stampin' Up! It's a great tool for the new material that Stampin' Up! is offering in the Holiday Mini Catalog, and that material is beautiful, BTW. I left the designer paper mostly undecorated so that I can put a message there for the recipient. Tucked inside the flap is one of my favorite flavors of herbal tea ... Ginger Snappish ... which is only available seasonally, unless you order online off of Amazon. Wouldn't it be fun to give this to a new mom, teacher, or anyone else who needs a moment to relax and unwind? And just think of the many ways that you could decorate it.

Well, thanks for stopping by the Stamping Station. Hope to see you again soon.

Blessings,
Julie
Share this Post Share to Facebook Share to Twitter Email This Pin This