Showing posts with label 3-D project. Show all posts

Thursday, November 7, 2013

Roller Derby Time!

Six-Sided Sampler, Crushed Curry, Basic Black, Whisper White

Seriously!  No, not for me.  For my sweet friend.  She was picked up by one of the Seattle Rat Pack teams.  How fun is that?!  So yes, I had to make her a card to congratulate her.  These are her team colors.  The greeting is from the Six-Sided Sampler set.  Isn't that cute?  The skate was made with the retired stocking die from Stampin' Up!'s catalog two years ago.  Just cut off the bottom of it.  The brake is the retired file tab punch.  I used crochet thread and braided three strands to get the strings.  Oval punch and circle punches later, voila! 

Ok, so I'm seriously behind on posting from the pics that I've already taken and totally behind on getting new pics taken.  Ummmm...having trouble finding the charger for my camera, too.  Maybe Christmas should come sooner so that Santa can be good to me and replace my 14 yr old camera that's dying.  :-D

Well, thanks for stopping by.  Looking forward to seeing you again soon!

Blessings,
Julie


Share this Post Share to Facebook Share to Twitter Email This Pin This


Thursday, February 2, 2012

Sweet, Sweet Little Duckie

 This little duckie is so adorable!  I made this card for a friend of mine, whom I call Little Duckling.  the duck and water are watercolored.  Yes, I should have waited longer for the duck to dry before coloring the water, but this photo makes it look much more yellow than it really is.  Consider it a reflection of the duck, right?  The little border on the bottom was made with my little flower punch from the set of three itty bitty punches.  The frame was made with my sizzlit and the center was punched out with the wide oval punch.  I popped the frame up a bit so that the lollie wouldn't be the only 3-D item on the card.  Oh, yes!  The Lollie!
Isn't this lollie lovely?  It was very easy!  I made it with my Big Shot and my new Designer Rosette XL Die.  I really love the scallops on the edge of the lollie.  Makes it so pretty!

So, what have you made with your Designer Rosette?  I'd love to see it!  What?  You don't have it yet?  Well, go click on that "Shop Now" button and choose the mini catalog option.  You're sure to find some really fun stuff.

Thanks for stopping by the Stamping Station!

Blessings,
Julie
Share this Post Share to Facebook Share to Twitter Email This Pin This


Friday, December 2, 2011

3-D Christmas Tree

Oh yes, I love this idea of the 3-D Christmas tree!  Whoever thought this one up is a genius!  The tree is stamped with the Pennant Parade stamp set and punched out with the Pennant Punch.  Scallops on the edge of the Designer Paper (Berry Bouquet) is the edge of the Ribbon Border punch.  The yellow star is a clear Rhinestone colored with a yellow Sharpie. 

I have a bunch of this project leftover from the workshop, so I think I'll be making some for my own cards to send out this year.  Yay!

Thanks for stopping by the Stamping Station!

Blessings,
Julie
Share this Post Share to Facebook Share to Twitter Email This Pin This


Tuesday, November 29, 2011

Snowy Easel Card

How about this for a fun card?  We made this easel card at the last workshop at the request of the hostess.  She saw one on display and wanted to learn how to make the easel.  We used the glitter window technique (packing tape and Dazzling Diamonds glitter) for the window to see the little girl.  The snowflake was cut with the snowflake decorative strip and the silver glimmer paper.  I have a few of these cut out and ready to go, so some people on my Christmas list might be receiving these.  Hey, it's fair game if it's already cut out, right?

Thanks for stopping by the Stamping Station!

Blessings,
Julie
Share this Post Share to Facebook Share to Twitter Email This Pin This


Monday, November 21, 2011

Online Extravaganza Sale

Yes!  It's finally here!  I love sales and this one is great!   Looks like there will be a daily special, besides all of the other items that Stampin' Up! has put on sale.  Just wait until you see!

This great tool is the new Simply Scored tool  Regularly, it sells for $29.95.  TODAY ONLY, you can buy it for $23.95 online!  Just click here to place your order.  Oh, and don't forget to look at the rest of the things on sale.  My pocket book isn't going to be nearly as full after I shop on this one! 
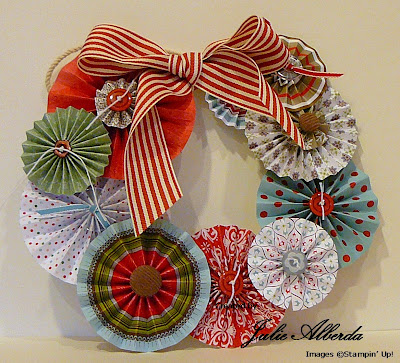
 And I know some of you are trying to figure out what you would do with the Simply Scored tool.  Oh, the fun you can have!  I'll be featuring some of the techniques in future posts, but here's an idea...the lollies that are so hot right now in the crafting world.  I made this wreath using Designer Papers and buttons.  Adorable, right?  All I had to do was use my Simply Scored to score either every 1/4" or every 3/8", fan fold, then glue on to a circle with the Sticky Strip adhesive or hot glue.  I prefer the Sticky Strip because then you don't have to worry about the glue cooling off too quickly before you can get the lolli just right. 
I also used my Circle Scissors Plus to cut one of the back pieces of cardboard from a Designer Paper pack to make the wreath circle.  The lollies are attached with glue dots.  So, let's see what you can do with your Simply Scored.  Here's the link to the Online Extravaganza Sale.  Let's see how much fun YOU can have!  :-D

Thanks for stopping by the Stamping Station.

Blessings,
Julie
Share this Post Share to Facebook Share to Twitter Email This Pin This


Friday, October 28, 2011

Owl Halloween Treats a la Natalie

I haven't had time to take photos and edit them, so I'm sharing some super cute owl treat bags that my friend Natalie made.  The owl head is made with the Top Note die.  Isn't it adorable?!?!  I believe the colors are Early Espresso, Chocolate Chip, Pumpkin Pie, So Saffron and Basic Black.  It would be really fun to make the noses out of the Pennant Punch.  The other punches are most likely the scallop punch, 1 3/8", 3/4" and 1" Circle punches. 

Thanks for stopping by the Stamping Station!

Blessings,
Julie
Share this Post Share to Facebook Share to Twitter Email This Pin This


Monday, September 26, 2011

Some Like it Coral...

Day of Gratitude, Calypso Coral, Lucky Limeade, Whisper White, Berry Blossoms DSP, retired ribbon, Word Window and Modern Label punches, Basic Pearls, Sticky Strip, Fun Flowers Bigz Die
Ok, so that WAS a corny title, but really, after a couple of years of blogging it's hard to come up with new ones!  Hey, so what do you think of this nifty little post it holder?  It's a gift to a hostess of mine.  I've written a note to her on the inside with the cute little golf pencil that's on a holder inside.  This is the first time that I've made a post it holder.  Not sure how really useful these are, but I think they're pretty.  Might just have to make some for some special teachers that I know.  I made this for the FS242 challenge.  I've used this post it holder as inspiration.  I think the next one I make is going to coordinate with the cool little Scooby Doo pens that I have.  :-)  I've used some retired Certainly Celery ribbon here and I think it's close enough to the Pear Pizzazz color.  The flowers were textured with the Lattice and Polka Dot embossing folders.  Make sure you add some Sticky Strip and the new Simply Scorin' tool to your next order.  You'll be sure to use them for a project like this.  It's so much easier to craft when you have the right tools!

Well, thanks for stopping by the Stamping Station once again.  I'd love to hear from you!

Blessings,
Julie
Share this Post Share to Facebook Share to Twitter Email This Pin This


Sunday, May 15, 2011

Strength and Hope Cancer Research Stamp Set

 So sorry for the long silence.  I needed to take a break so that we could take care of some other events in the family.  You know ... that school stuff and the club stuff.  Read on past this to see our fun projects.  In the meantime, I made this card for a Summer Mini Catalog swap.  I really like this Strength and Hope stamp set.  For this card I stamped the Bella Toile background in Pink Pirouette on Pink Pirouette and then highlighted it with White Gel Pen.  The tag is Pretty in Pink and Old Olive and the stamp is again highlighted with White Gel Pen.  The punches at the top are those wonderful 3-step punches.  The top layer is sponged with my Frost White Shimmer Paint and accented with the Basic Pearl.  The butterfly was sponged with Pretty in Pink, Pink Pirouette and Old Olive, stamped two and cut both of them out, then sponged the shimmer paint on the top butterfly. 
 And this weekend was the big race!  Our boys club from our church (called Cadets) had a large gathering of local Cadet groups and raced their Pinewood Derby cars.  Today, our girls club (GEMS) raced their cars against the boys.  Oh, what a great time we had today!  So this submarine is my son's.  Yes, my husband did "help" with this one.  :-D  But the idea was my son's. 
 And this was my husband's car.  Yes, it's that delightful lovebug Herbie!  My husband really loves to get into making these cars.  Look at the details!  He did a great job.  Unfortunately, Herbie didn't show us any of his tricks today, so he didn't take first place.  :( 
And last, but certainly not least, the state reports and floats for the 4th grade!  My son had Hawaii assigned to him (oh, isn't that a shame?!  :D)  We had alot of fun putting this paper mache islan together.  I was able to use some of my trusty SU! supplies to help complete this, including my Crystal Effects to stick the sand on and my Big Shot to make the lettering.  The waves were made with puff paint and yes, we had to include Lilo and Stitch! 

Whew!  It's been a very busy two weeks!  Now, for a little down time.  Right!  Like you're going to believe that one, right?!  Yes, another busy week, but I'm hoping for some stamping time tonight and maybe tomorrow.  In the meantime, I hope you find some fun stamping time and family time.

Thanks for stopping by the Stamping Station.

Blessings,
Julie
Share this Post Share to Facebook Share to Twitter Email This Pin This


Saturday, April 9, 2011

Treat Bag

Here's a fun little treat bag.  It measures approximately 2 x 3.  I used the Saffron Grosgrain from SAB a couple of years ago for the handles.  The flower was made with the Build a Blossom punch.  The DP is retired, as is the yellow brads.  Looking at it now, I should have used a Melon Mambo circle to glue the petals to.  Oh well, live and learn, right? 
Thanks for stopping by the Stamping Station.
Blessings!
Julie
Share this Post Share to Facebook Share to Twitter Email This Pin This


Tuesday, March 1, 2011

Scrapbook Flip Up Book

 Oh yeah!  It's a Flip Up Scrapbook.  I made this one for a friend as a swap.  I kept the color scheme and decorations simple so that there would be plenty of room for photos, journaling, and embellishments on top of the photos. 
 This Soft Suede Designer Paper is retired, but it is still available in other designs in the Idea Book and Catalog.  HOWEVER, the gorgeous red glitter paper that I used to decorate with?  Well, that's only in the Occasions Mini Catalog. 
 You know what that means, don't you?  You have to grab some in case it's not available in the next mini catalog or in case it doesn't make it into the new Idea Book & Catalog!  (I just bought two more packages of it.....) 
 And don't forget the pretty butterflies from the butterfly embosslit and the flowers...both only available through Stampin' Up!  As you can probably see, the bottoms of these "rooms" fold up...
...and then you can tie it closed to put out on your coffee table or to send as a gift to a proud grandparent or dear friend.  I've ordered a Simply Scrappin' Kit that I think will work quite nicely with this scrapbook.  If it works out as well as I think it will, I'll be offering a class in April or May, so be on the lookout for that announcement.
     I gave one of these to my last hostess.  It was made with pink and purple because she has 3 daughters.  Her comment to me was that she felt spoiled!  Now wouldn't you want someone to feel like you spoiled them too?  So go for it!  Make a special gift for someone instead of buying something and see how their eyes light up and how their heart shines in their eyes.  I dare ya!  :-)

Thanks for stopping by the Stamping Station.

Blessings,
Julie
Share this Post Share to Facebook Share to Twitter Email This Pin This


Wednesday, February 16, 2011

Stampin' Up! Supplies Aren't Just for Paper Crafting....

I love helping my kids with their school project, especially when it means that we can make something really special with my Stampin' Up! supplies.  Look at this cool shield!  My son Nate's class is finishing up a unit on The Lion, The Witch, and the Wardrobe.  To finish it up, they needed to make something and they had a list of choices.  Nate chose to make Peter's shield.  Of course my husband had to help with the design, cutting, and decoration.  He asked me if we had some cardboard that he could make the lion out of.  Well, you KNOW what's better than cardboard!  SU!  I got out my prized Red Glitter Paper, we traced the lion onto it, cut it out, and it shows wonderfully against the silver paint.  Sorry that the picture doesn't really do it justice.
You'll also notice that the crown on the shield is no ordinary crown.  Oh no!  I used Crystal Effects on it, then used my chunky glitter for a fabulous look.  The Crystal Effects really made it 3-D.  Oh, and hey, what do you think of the side view from our deck?  You'd never know that we lived in the middle of the city!  The main view looks over the valley to another hill, with the Cascade Mountains behind it.  Oh, how I love it!  There are real advantages to living on the side of a hill.  And yes, it's a big hill!

Well, thanks for stopping by the Stamping Station once again and indulging me in a bit of showing off my family and our fun crafting together. 

Blessings,
Julie
Share this Post Share to Facebook Share to Twitter Email This Pin This


Monday, January 24, 2011

Coaster Luminary

Hey, look what I made!  There was a challenge on VSN to make a luminary with some examples.  The only catch is that you have to make it in 45 minutes.  Ok, that apparently doesn't work for me when I have an elaborate idea and I've never made one before!  The whole thing actually took me 1:40, but I'm really happy with the result and that my original design worked.  I covered some coasters (do you know that Outback passes out a pile of coasters and they don't usually get wet?) with Black on the outside and White on the inside, then sent them through the Big Shot with my Lattice Die, which is, of course, exclusive to Stampin' Up!  I then cut pieces of vellum, covered them with glue stick, stuck them on the white side and then covered with glitter.  After cutting out the green lattices, I glued them on with Crystal Effects, which can double as an amazing glue, besides being a beautiful accessory.  (If I'd had more time, I would have covered the centers of the flowers with it.)
 The rest of the pieces are all cut with the Big Shot.  I punched the holes with my Crop-A-Dile and threaded my Marina Mist Taffeta through it.  This is what it looks like in the dark with my battery powered tea light.  I hope you can see the detail.
Oooooo, yes, it does change colors.  Isn't it cool?!  I really like it!  Paper crafting is so much fun.  And I can't wait to give this away and see the recipient's face.  Give it away?!  Actually, I'm not sure if I'll be able to part with it.  If I am, I think one of my SAB hostesses might just receive this luminary.

Thanks for stopping by the Stamping Station. 

Blessings,
Julie
Share this Post Share to Facebook Share to Twitter Email This Pin This


Saturday, September 25, 2010

Projects for Upcoming World Cardmaking Day Party

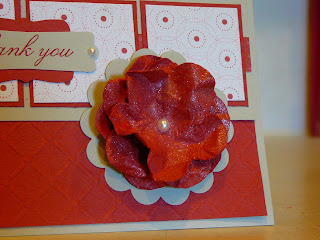
 I'm getting really excited to have a fun day here next week Saturday.  This scrunched up flower is something that I'll be teaching.  I can't find the blog that I saw the instructions on, so if it was yours, please let me know!  I'd love to give you credit.  I really love the way the Vanilla Smooch Spritz makes this flower sparkle.  I'll share the full card next week.
 And you've seen this card already, but wanted to include it in this post since it will be a Make and Take at the party.
And these sweet little purse cards are the other Make and Take.  They're super easy to make, using the Scallop Oval XL die and the Big Shot.

So, if you haven't RSVP'd to the event yet, please let me know!  If you live out of town and would still like to make the projects, you can purchase the paper, instructions and accessories supplies for these two projects for $5, including shipping.   Just email me at the address on the upper left and we'll iron out the details.  If you also need the stamp sets for the birthday card, click on the catalog link, select me as your demonstrator and purchase the On Your Birthday and Hello Again stamp sets.

Thanks for stopping by the Stamping Station.

Blessings,
Julie
Share this Post Share to Facebook Share to Twitter Email This Pin This


Saturday, September 18, 2010

Autumn Splendor

I just had to show you my beautiful calla lily. We had such a wet summer, that most of my callas didn't get a chance to bloom, but this little beauty did. I love the shape and elegance of the calla lily. It's one of my favorite flowers. I hope we get a few more brave flowers before the frosts start up. Now to pick up this color combo and make something of it. I dare you to try, too! :-)


And this little pumpkin was made with 12 strips of 3" x 1/2" Cajun Craze cardstock. The leaves are stamped with the leaf from Autumn Harvest. It's one of the decorations that I'm making for my World Card Making Day party. And for once, my alder leaves came in handy! (Usually they are just pests.) So what have you made to reflect the beautiful colors of nature lately? I'd love to see what you've made. Feel free to leave a link to a public gallery in the comments.

Thanks for stopping by the Stamping Station.

Blessings,
Julie
Share this Post Share to Facebook Share to Twitter Email This Pin This


Saturday, September 11, 2010

Teabag Holder Gift

Do you like making 3-D projects? Well, I'm really liking this one. I started with the 3D071 challenge from Stampin' Addicts. I used a Bigelow tea bag so I increased the main piece of cardstock to 8 1/2" x 3 3/4" and scored at 2" and 5 1/4". The decorative pieces measure 3 3/8" x 2 7/8", 3 1/4" x 2 3/4", 3" x 2 1/2", and 2 3/4" x 2 1/4". This teabag holder was a great excuse to use my cute new Two-Step Owl punch. He's sitting on the branch from the Two-Step Bird punch, another one of my favorites. Isn't he adorable???!!!!! If you've seen him and haven't decided if you need him yet, YOU DO! :-)
Ok, so please ignore the fact that this picture is sideways. Everything we tried just didn't work. We even went into the html and nothing worked. Grrrr... Anyway, the flap is covered by a couple of strips made with the new Tasteful Trim XL Die from Stampin' Up! It's a great tool for the new material that Stampin' Up! is offering in the Holiday Mini Catalog, and that material is beautiful, BTW. I left the designer paper mostly undecorated so that I can put a message there for the recipient. Tucked inside the flap is one of my favorite flavors of herbal tea ... Ginger Snappish ... which is only available seasonally, unless you order online off of Amazon. Wouldn't it be fun to give this to a new mom, teacher, or anyone else who needs a moment to relax and unwind? And just think of the many ways that you could decorate it.

Well, thanks for stopping by the Stamping Station. Hope to see you again soon.

Blessings,
Julie
Share this Post Share to Facebook Share to Twitter Email This Pin This


Tuesday, May 5, 2009

Designer Paper Gift Card Bag

It's an icky wet stormy day here today in Western WA. A perfect day to put off the Costco trip (after all, why get everything wet?) and stamp instead! Yup! That's what my boys would tell me to do. They don't care if we have milk in the house or not. NOT! Well, maybe later...I'll go later. If I wait long enough, the rain will be lighter, right? Right!
I made this bag yesterday in 15 minutes! Yes! You see, Stampin' Up! has these wonderful Designer Series Papers that are soooooooo easy peasy to use. I don't need to decide on a color combo because it's already done for me. I don't need to do much embellishing because it's already done for me. I just need to create....my favorite thing to do! And this month Stampin' Up! is having a special on their Designer Series Papers. Buy 3, get one FREE! Yes! Free is at the top of my favorite words list. Want to see how beautiful these papers are and easy to use? Well, swing by here this weekend (May 8th - 10th) to see the Parade of Papers Blog Hop. I'm stop #3. I'll have a link to the stops before and after me. Each blog will have a link for you to go to the next blog and each blog will feature a different set of Designer Series Papers.
Yes! You will get to see them all! You can click on over to my website to shop online for your Designer Series Paper. You'll want some in hand for this weekend, after you see the fabulous projects and scrapbooking pages that have been made by my demonstrator friends at Stampin' Addicts. I can hardly wait for the blog hop to get started...I think you'll be blown away by what you see.
Oh...right...I did post a project here and haven't given you the deets yet...silly me! I made this by request from my middle son Nate. He had a birthday party to attend yesterday and asked me to put the gift card in "one of those bags that you made before". Uh...right...which one? Oh...THAT one! This is a 2-5-7-10 box that I modified to 2-5.5-7.5-11. I used at piece of 8 1/2 x 12 Rainbow Sherbet DSP, my Party Hearty stamp set and Stampin' Write Markers. After deciding not to use accessories (since this is for a 2nd grade boy and he wouldn't think ribbons and rhinestone brads were very cool) I decorated with popped up images instead. 15 minutes from start to finish. We have to keep it simple sometimes, right?
So make sure that you come back to visit sometime this weekend for the blog hop. You won't want to miss it and the links to the other blogs will be gone after Sunday the 10th. See you then!

Blessings,
Julie
Share this Post Share to Facebook Share to Twitter Email This Pin This


Wednesday, February 4, 2009

Yummy Sale-A-Bration Swap Card

Here's a card featuring the SAB Delicate Dots Designer Paper, an accordian flower, and the SAB Yummy stamp set. I used the Top Note Bigz Die for both layers behind the accordian flower and cut on the perforation on the Designer Paper layer. (If you're left with some little rough tabs, sand them off with the SU! sanding block.) I used my markers to color the Yummy stamp with Celery and Bashful Blue before stamping on Whisper White cardstock. I hand cut around the stamp and then around the blue behind it. How do you make the accordian flower? For this size accordian, I used a 12" by 3/4" piece of DS paper and scored it every 1/4". After folding into an accordian, I attached both ends together. Make sure you let the adhesive dry at this point. After I figured out where my circle was going to be, I applied 2-Way glue in a circular shape, being generous with it, then placed the accordian on it and held it gently down while the glue dried. Didn't take long at all. For the center, I put two pop-up glue dots, one on top of the other, to hold the Yummy piece in place above the accordian.
Supplies: Barely Banana, Bashful Blue, Whisper White cardstock, Delicate Dots DP, Top Note Bigz Die, Yummy stamp set, Celery 5/8" grosgrain, 2-Way Glue Pen.
Thanks for stopping by the Stamping Station.
Blessings,
Julie
Share this Post Share to Facebook Share to Twitter Email This Pin This


Wednesday, December 24, 2008

2-5-7-10 Gift Box


Here's a cute little gift bag under my tree. I used the Ski Slope Designer Series Paper for the main cardstock and a small strip of whisper white for the scalloped edge. The ribbon is retired silver narrow organdy. I stamped the mittens with the Scandinavian Season, tied them with crochet thread and hung them from the bow. The mittens serve the double purpose of decoration and gift tag. I love making these boxes - they're so easy. For those of you who came to my 3-D class, this is the 2-5-7-10 box. I've copied the instructions here so that you can easily recreate this.

Instructions:


Hold an 11 x 8 1/2” piece of cardstock in the landscape orientation and score at 2, 5, 7, & 10, Turn to the portrait orientation and score at 2 & 7. On the longer 2” side, cut all of the first row off except for the 2 x 3 section in between the 7 & 10 scores. On the opposite side which has the 1 1/2” scored section cut along the score lines to the first cross section to create flaps; cut the smallest square (1 1/2 x 1) at the end off. On the 1” wide section, cut the corners off at a diagonal to make the inside flap. Fold on all remaining score lines. Use Tombow or Sticky strip along the 1” flap and attach to other end of box. Glue the bottom flaps together after folding. Use your fingers in the sides of the top of the box to create a fold and then fold the top flap over. Secure with ribbon, Velcro dot, or magnetic snaps.

So let me know what you think. Have you tried this? Upload a pic and copy the link into your comment here. I'd love to see your creations too!

Share this Post Share to Facebook Share to Twitter Email This Pin This


Tuesday, November 25, 2008

I've Been Framed!!


Ever see a wall in your home and wish that you had just the right thing to hang there? Well, that spot for me is my entryway. What do you put up? And then you want to change it for special holidays? I was shopping at a thrift store and found this great frame in perfect condition, but without the glass. Glass? Not necessary if you're stamping something, right? I paid $2 for this frams and look what it became! I used the Watercolor Wonder Crayons for the Watercolor Wash technique for the background. Those of you who came to my Christmas Card Cranks were able to try it out and found out how much fun it is. One frame says "Hope", one says "Joy", and the middle frame has an image of the manger scene, complete with star and Luke 2:11. I glittered the star, halo over the baby Jesus, and the first letters of the words. I'm really happy with the way it turned out. Come on over to see it in person.

Stamp Sets: Illuminations, Season of Simple Grace

Watercolor Wonder Crayons & Sponges, Dazzling Diamonds Glitter & 2-Way Glue Pen

Share this Post Share to Facebook Share to Twitter Email This Pin This


Sunday, November 9, 2008

Altoid Tin

I've seen so many decorated Altoid tins. I just had to try it myself! This is the second one I made. I gave another one away as a hostess gift for my last workshop. Since it's a candy tin, I decided to fill it with "card candy". Card candy is an image that is pre-stamped and ready to go on the center of a card. That makes is super simple to make a quick card when you needed one five minutes ago. Ever been there? I used my ATG framing gun to attach the Bella Rose Designer Series Paper, though I imagine that wonderful Tombow would also do the trick. The bow is made of Red Riding Hood Taffeta (I just LOVE that ribbon!) folded over a few times and tied in the center with gold elastic cord. The poinsettia is made by punching two flowers with the five petal punch. After punching the flowers out, place them on a foam mat and draw in the veins with a stylus. I punched three holes in the center and used gold brads to look like the center of the flower. I think this would make a great gift and would also double as a gift card holder!


Share this Post Share to Facebook Share to Twitter Email This Pin This